

Wednesday, July 31, 2013
Tuesday, July 30, 2013
The Plank Challenge
**The month of August will have an extra weekly post on Tuesdays so that you can see how I'm doing with this new challenge.
It has been a long time since I've attempted a challenge, so when I was invited to join this one by my friend Kenny I had no choice but to say yes!
 This is going to challenge me on several levels I think. After my second C-section, my abdominal strength was at level 0. In the past 4 years I have progressed to the point that I can sit from a laying position, and I no longer need to roll out of bed in order to stand. I know impressive, but don't get jealous yet.
Just this past winter I decided to see if planks would help. My first time I think I made it an impressive 10 seconds (Yes, I shook like water on a hot griddle the entire time). At that point I almost gave up. But I thought "hey if people can do this for 4 minutes I can surely make it to 1". After a week or so I got up to 1 minute, oh yeah, I am all that. I decided to incorporate it into my daily circle-time exercise at preschool. Nothing brings you back to reality faster than 4 year old kids lasting way longer than I could even think about.
I also have to learn how to upload videos and imbed them into posts. If you've been following me for long, you have noticed I have never posted a video. Since the challenge is a time thing, I can't really just say "yep I did it". You guys are going to have to see the time stamp so that I can't cheat. It also means you get to see me all red faced, shaking, and grunting in pain. So if you think your stomach is up to it.
Here is my baseline video:
It has been a long time since I've attempted a challenge, so when I was invited to join this one by my friend Kenny I had no choice but to say yes!

Just this past winter I decided to see if planks would help. My first time I think I made it an impressive 10 seconds (Yes, I shook like water on a hot griddle the entire time). At that point I almost gave up. But I thought "hey if people can do this for 4 minutes I can surely make it to 1". After a week or so I got up to 1 minute, oh yeah, I am all that. I decided to incorporate it into my daily circle-time exercise at preschool. Nothing brings you back to reality faster than 4 year old kids lasting way longer than I could even think about.
I also have to learn how to upload videos and imbed them into posts. If you've been following me for long, you have noticed I have never posted a video. Since the challenge is a time thing, I can't really just say "yep I did it". You guys are going to have to see the time stamp so that I can't cheat. It also means you get to see me all red faced, shaking, and grunting in pain. So if you think your stomach is up to it.
Here is my baseline video:
So this is my first attempt at recording myself. I wasn't about to do a retake, so it is what it is. Can I just say "I really do have the 'Weber Nose', and when did I start sounding like I was in the movie Fargo?"
Monday, July 29, 2013
Almost Famous

During a recent bike ride, the girls and I decided to stop by the depot to listen to a country music band. Yep, every Tuesday a band sets up on the flatbed train car that serves as the stage, and people bring lawn chairs and blankets to enjoy the show. The Mille Lacs County Historical Society opens the depot so the bathrooms are accessible. While waiting for my girls to emerge, I busied myself looking at the art on the wall.
Suddenly an image caught my eye. I enjoyed reading the history of our home's previous caretakers, and know that I get to continue its story on here.

Thursday, July 25, 2013
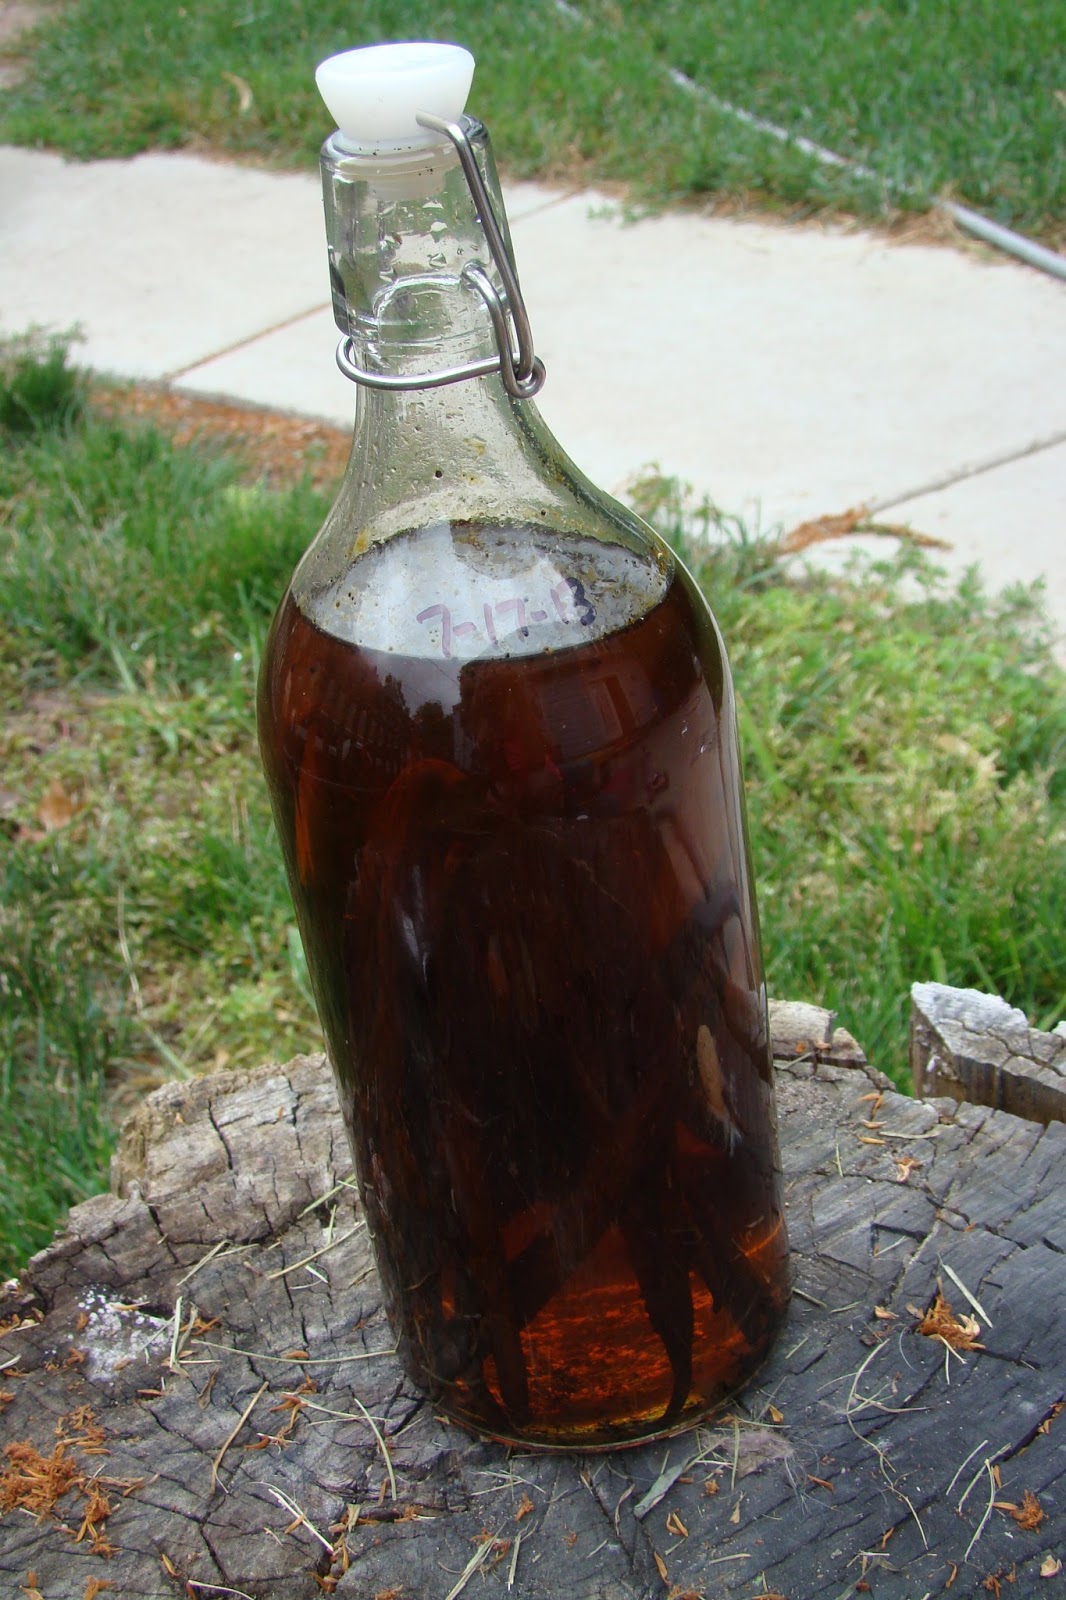
DIY: Vanilla Extract

I started by ordering Vanilla Beans on Amazon. Since I used my Discover Rewards it was 'free'. I use free loosely as many finance people would debate that assertion.

Most online recipes recommend using vodka as your liquid medium, but suggest that you can try rum, brandy, etc for different flavors. Since I like to live on the edge I jumped in. I picked up a bottle of vodka and a bottle of rum. I also had a bottle of Cacique Guaro that friends brought back from Costa Rica.
Basic Recipe:
10 Vanilla Beans split lengthwise
1 Liter Vodka

I sliced the beans in half lengthwise to release the seeds for deeper saturation. Fresh beans are soft and pliable, mine where both and the smell was amazing!
I divided my vanilla stalks into 4 bottles making sure that they were completely covered in the liquid. They will mold and destroy the entire bottle if they are not completely submerged.

Store in a cool dark place, and shake every couple of days. After 1 week it is a nice caramel color that will continue to deepen as the flavor permeates. Check back in a few months and I will let you know which combination was the best flavor.
Wednesday, July 24, 2013

Monday, July 22, 2013
Garden Planning


Since I didn't know what many of them were I was at a lost about how to care for them. All of them were over grown at their time of transplant so I cut them all way down, and waited to see what happened. 2 died, 2 are looking great, 2 are in need of pruning and 1 came back so ugly it had to go. The day lilies have grown so much they are ready to be split, which is great because a few others I want to remove.
 Needs to be cut down every fall |
 Needs to be pruned |
 looking good, mild pruning |
 oddly shaped but back from the dead! |
 Pretty but in needs to move |
 looking great! |
My head is starting to spin a little. How am I suppose to remember all this in the fall and spring after the foliage dies off and I have no idea what anything is?

To start I dug out the giant ugly one. (Sorry, got to him before I grabbed my camera, but trust me huge and weird looking) Unlike transplanting when you want the plant to live, it doesn't really matter what time of year it is to successfully kill a plant. Then I took out my tape measure so that I could set my thoughts to paper.

As you can see it is long and skinny.

The circles are colored to represent the flower colors. Black are ones to be permanently removed, arrows show where things will move, and yes that is a question mark, because I still don't know what will grow in that spot. (Luckily, I now know a few that wont.)
I like the idea of obscuring the fence with flowering bushes and having a variety of heights and colors that bloom throughout the season. I love hostas and will keep them as my low plant in the front, I can then add in a few short annuals in between for constant summer color.
I hope that someday I will have an indoor growing system so that I can start more seed and get lots more plants for my $$.

Something like this
Thursday, July 18, 2013
Brown Sugar for Hot Cereal

We like oatmeal in this house, but instead of prepackaged servings we make our own. 1/2 cup of quick oats and your favorite toppings is all you need.
We like blueberries, strawberries, raisins, dried cranberries, dried cherries, walnuts, pecans, and brown sugar. Now that I've been introduced to this souped up recipe for brown sugar, we'll be using that! Simply mix it up and store in an airtight container.
Brown Sugar for Hot Cereal
1 cup brown sugar
3/4 tsp cinnamon
1/4 tsp pumpkin pie spice
1/4 tsp nutmeg
Combine all ingredients well, I used a fork to stir out any clumps. Store in airtight container. Use 1 spoonful per serving.
DIY: Instant Oatmeal
Zip top Sandwich bag
1/3 Cup of Quick Cook oats
1 Tablespoon of Brown Sugar Mix
1 Tablespoon of your favorite dried fruit
Above measures will make a single serving, make up as many as you want and have them in the pantry ready to go. Just add water and microwave on high 90 seconds.
Wednesday, July 17, 2013

Monday, July 15, 2013
6 of One, Half Dozen of the Other
 |
| Cute Boy |
We got there early so that I could take some pictures and we could get settled before the movie started.
.jpg)
What a great night. The ticket taker/greeter was super friendly, he had seen me taking pictures and apologized for the broken neon! He then told us about the evening's activities before the movie and pointed out the window washer.
After finding our spot we got right down to playing Mini-golf.

Once the retro pre-show cartoons started to play, I headed to the concession stand for some snacks.

The snack shack was hopping, but I still got to visit for a few minutes with the owner who was busy making popcorn. My Vet figured out how to override the daytime running lights on the Honda and we settled in for a cute movie. (It had been a long day, so we didn't stay for the second feature. So I don't know if that one was cute or not.)
A lot has changed for me and My Vet in the past 19 years, but a lot has stayed the same.
Motorcycles have made way for a family friendly convertible. Green screen DOS prompt email while attending college in different states, has become Words With Friends on our smartphones as we sit in the living room. Waiting tables for tips, has become waiting tables for an "I love you mom".
We have done some pretty neat things over the years, visited some cool locations, and met some amazing people. That cute boy became a doctor, a dad, and a (retired) mayor.
We've hit bumps along the way like any other couple, but our blessings have far exceeded our stumbles. I am grateful for the legacy of prayer that both of our parents instilled in us. I know that long before we even met, his parents where praying for me, and mine him.
Like you, I don't know what the future has in store for us. I am just happy to have my helpmate for the journey.
**This post is not sponsored, we just really enjoyed ourselves, and I thought you might too.
**UPDATE**
This will be the last season for the Starlite, so be sure to get there this summer.
Thursday, July 11, 2013
DIY: Brownie Mix Recipe

I logged onto Pinterest and found this recipe to try. The best part was that I already had all the ingredients on hand to make up several batches. Yep I averted a crisis and even got in some 'freezer' cooking! I did change up the original instructions for optimal texture.

Brownie Mix
1 1/4 cups all-purpose flour
1 teaspoon baking powder
1 teaspoon salt
2/3 cup unsweetened cocoa powder
2 cups white sugar
Mix ingredients together and place in a jar or container. I used cute flip top jars from Ikea, I've also seen them at World Market.

When you are ready to make brownies add
1 cup melted butter
3 eggs
1 teaspoon vanilla
Stir for no more than 50 strokes. Over mixing will make its consistency more cake like and less brownie like. Pour into an Ungreased 9×13 pan. Spread batter evenly and bake at 350 for 22-25 minutes or until toothpick inserted in center comes out clean.
Wednesday, July 10, 2013
Shutterfly: Free Guest Book only pay shipping

What a neat idea! I wonder if you could use it as a Graduation Guest book, or milestone birthday, anniversary etc as well?


Monday, July 8, 2013
Rubbed the Right Way
I have lots of little updates happening around the house. I've heard that brass is starting to make a comeback. Since I am no slave to fashion, I am still embracing the Oil Rubbed Bronze movement. Today I was blessed with some mild weather and a little bit of time, so I decided to see what I could get done before My Vet got home.
First I grabbed a screwdriver and started to remove some hardware. Then I remembered I wanted to share it with you and stopped so I could grab a before photo.

I removed grime and old paint from the hardware with some fingernail polish remover, There are probably lots of things that would work. We did pedicures over the weekend so I had it handy.

I finished removing the hardware and found an old piece of foam to anchor my pieces I wanted to paint. Since knobs tend to take a beating, I made sure to prime.

Using a good quality paint, I lightly sprayed several coats of paint. Since they were really light, they dried quickly and I was quickly able to do more coats. The light coats also insured no paint drips.

I then grabbed the ORB and did several more light coats, making sure to get around any moving parts and getting all angles.
After letting it sit for a bit to dry in the shade, I reinstalled and walla!

I liked the results so much I decided to make over all the old mismatched knobs in the house. They look great, but now the hinges look dingy...

Thursday, July 4, 2013
Orange You Glad I Didn't Say Banana?
Lame knock-knock joke aside, I have been wanting to change my red door and have gone back and forth between banana or orange?
I like the touches of yellow, but I know My Vet isn't a huge fan of the pastel blue or the yellow, So I decided Blaze Orange in honor of his love of hunting would be my inspiration.


 |
| Old Picture of the red door. |
I like the touches of yellow, but I know My Vet isn't a huge fan of the pastel blue or the yellow, So I decided Blaze Orange in honor of his love of hunting would be my inspiration.

I like how it ties in so well. This is becoming my favorite room in the house! Have you been doing any painting lately?
 |
| I know removing the screen would make it pop, but WAY to many bugs to do that! |

I also updated the hardware with some paint!
View some other great ideas over at “Inspire Me Please” Weekend Blog Hop #18 hosted by Love of family and home/
Wednesday, July 3, 2013

Giveaway in Honor of My Mom's Birthday!

As first time visitors, the generous manager at PF Chang's gave us a couple of free $10 gift cards. I have often thought about trying them, but have never gotten around to it. So I thought I would share my card with you, so that you can get there too!

a Rafflecopter giveaway
**This is not a sponsored giveaway. I just wanted to share with my friends.
Monday, July 1, 2013
Rhubarb Fizz Recipe

One of my favorite plants came from Siberia and is abundant in yards all around MN, Rhubarb. Thanks to my Aunt Jennifer, who is a part of the Annual Rhubarb Festival in Lanesboro, MN, I have an awesome book
During a recent dinner with friends, we had an awesome Rhubarb Custard Pie that stirred discussion of rhubarb treats we've had. They mentioned a Rhubarb Slush that was served to them by the wife of an older gentleman they had met. That was years ago, and they had never run across it again, My Vet who has eaten rhubarb all his life had never heard of it, I decided I was going to figure it out. As usual my first instinct was to Google it and found this recipe. I modified it slightly so make it more rhubarby. Here is what I did.
 Rhubarb Fizz
8 Cups diced Rhubarb (Fresh or Frozen)
2 Cups of Water
2/3 Cup of Sugar
2 Cups of Apple Juice (next time I would only use 1)
1 16oz can of Pink Lemonade Frozen Concentrate thawed
2 Liter bottle of Lemon Lime Soda
In a sauce pan bring rhubarb, water, and sugar to a boil. Simmer 5 Minutes until rhubarb is breaking down. Cool for 30 minutes. Use a blender to puree the mixture half at a time. Pour into a freezer safe container, mix in apple juice and lemonade concentrate. Mix and Freeze. Mine was solid enough around the edges to use the next day, and continued to harden for another 24 hours.
Serve by scooping 1/3 cup into a glass and topping off with a cup of Soda. Stir and serve
It was good, but a bit lemony and less rhubarby. After trying it I remembered The Divine Rhubarb Committee's cookbook
Subscribe to:
Comments
(
Atom
)